Showing posts with label card making. Show all posts

Tuesday, September 4, 2012

Using up my old stash.

I was just popping in to say hello and share a couple of cards I made this week.  I hope everyone had a nice summer, labor day and an easy back to school week.  

This summer, I have been very project focused.  This year I was determined to go back to some old projects I never finished and complete them.  So far, I've completed 4 projects that have been laying around for quite a while. (Yay!)  And it was fun combining those old supplies with newer embellishments and paper.  

Anyway, these cards were made using the WRMK Elegant paper collection.  I also found some old Prima flowers from the Got Flowers? collection that were a perfect match for this paper.  If you are a loyal reader you know that I love combining old with new and these little flowers are probably 5 years old now.  Yet, I still have a ton of them and I don't want to get rid of them.  So how many jars of old Prima flowers do you still have in your collection?


The little pearls are actually made using the Viva Decor Pearl pen in Sunny Yellow.  The chipboard tag is also old and unknown now.  The stamps are KI Memories and the Hello sticker font is also from an old card making kit by Lisa Bearnson and Becky Higgings.   

I've been working on busting through my stash lately so you will see more projects that combine old and new soon.   

Are there any supplies you own that aren't "in style" anymore but you just can't seem to get rid of it? I have a bunch, like the foam stamps.  I still love the designs but just don't think to use them.  Please share some of your tips for using up your stash with me. 

All I ever see in scrapbooking and cardmaking blogs is new, new, new. And I can no longer justify (to myself) purchasing the huge amounts of scrapbooking supplies I used to.  It just seems like such a waste sometimes.

So, until next time...happy stash-busting!

Cat 

Wednesday, December 21, 2011

More Christmas Cards

Just wanted to share some more Christmas Cards I made this year.  This were made with a hodge podge of supplies I had on hand.  Dazzles from HOTP, cards from the Michael’s $1 bin, ribbon, my own white shimmer mist (mixed perfect pearls with water, alcohol, and a little white acrylic paint), etc.  I hope you like them!
CIMG2585CIMG2587CIMG2572CIMG2579CIMG2578
These HOTP dazzles are so cute!  After I made these cards, I didn’t want to give them away.  LOL!
Merry Christmas!
Cat

Wednesday, December 14, 2011

Last Minute Christmas Cards

Hello! I’m back and I have some quick and easy Christmas card ideas you can make by this weekend! Yes you can do this!
One uses the Cricut, the second uses stamping and the third one uses stickers.
The first simple card idea involves the Cricut.
CIMG2580
In order to make these cards fast it’s best to use premade blank cards. You can get them at Michaels with your 40% off coupon. 
First, find some holiday word art from any cartridge. Here I’m using Joys of the Season from the Wrap It Up cartridge.  Use fancy paper like foiled or glittered paper so it looks special.
Then find a background diecut and cut it so it fits your card.  (I used the Spring Holiday Cards cart for this background). Emboss it with an embossing folder.  Ink your embossed diecut and adhere it to your card.  You can pop dot it if you wish to create a 3D effect. 
Then add another background diecut for your word art and cut it to size.  I used  Spellbinders Nestabilities Labels One die for this one.
Add your word art and tie a little twine if you wish to add a cute embellishment. 
Now, you can leave it like this or mist it with some clear shimmer spray to give the entire card a little sparkle. And voila, you are done! 
The second card was created with one stamp and fancy foiled paper.
CIMG2588
Cut your fancy patterned paper to fit card.  Trim with matching ric rac ribbon.  Stamp your image and you can either emboss or glitter it for a little shine.  Use a corner punch and that’s it!  Another quick and easy card.  Stamps are from $1 Micheals bin – ornaments and Close to My Heart –Joy. I’ve had these for a few years so I don’t know if they are still available.  The paper is from Hobby Lobby – I got these on clearance last year.  May still be around this year.
The final card is super simple also and uses stickers.
CIMG2583
These cute stickers I picked up at Michael’s for 79 cents!   They are epoxy holographic stickers. How cute is this!  All I did here was cut a couple of pieces of paper and adhered them together and then wrapped the ribbon around it.  I created the knot on the ribbon before I adhered it to the card.
Then I used my 1 1/2 inch scalloped punch and my 1 inch round punch.  Layered the punches together and attached the stickers.  For the greeting I used two stamps.  A snowflake stamp with a light colored ink and then stamped the greeting over that.  No embossing or anything fancy.  These cards are done!
I hope these samples help you get those cards completed.  Remember to keep the cards simple and without too many 3D embellishments so they go through the mail intact.
Stay tuned as I’ll be posting my holiday tags in the next few days. Super simple and super cute also.
Cat
 

Sunday, May 1, 2011

Mother’s Day Card and Envelope Faux Pas

Happy Sunday!  Hope you are enjoying the remainder of your weekend.  This weekend I went to two crops. How productive of me, right? Well, so-so productive anyway. I really didn’t plan very well for my crops so I just took some page kits and slapped them together.  I didn’t even have pictures for some of them and they all need some final touchups. (sigh!)
 
I don’t know if I’ll buy page kits ever again.  Don’t get me wrong, they are great designs and make for fast pages, but for me it‘s really hard to conform my pictures to the page kits. So, I usually end up changing the original intended design which really doesn’t save me much time. Maybe I’ll post a couple of them once I get the final touches done. Do you use any page kits? I would love to know how you work with them.

Ok, so now to my original topic – Mother’s Day Cards!  This year I used my Cricut & Gypsy (you don’t need the gypsy to create these cards) to design my card and I have to say I am really pleased with the results. 
Here is the first color way. 
 CIMG2926
The card itself and the flower were from Sentimentals; the topper base and shadow were from Spring Holiday Cards; the label from Tags, Bags, Boxes. Other supplies used were My Minds Eye paper, Stickles glitter, 3Birds letter rubons, Coredinations cardstock which I embossed with the Damask style Cuttlebug folder, misc cardstock, ribbon and pearls. 

Now, here’s a rookie mistake I made and I about kicked myself for it.  If anything else please remember this from this post: When you make a card on the Cricut, always – always cut the envelope (using the fit to page feature) first!! This way you know what size card you need to make. 

I was too busy trying to fit two cards on 12 x 12 mat that I didn’t even consider the envelope. So, now I had a card but the envelope that goes with it won’t work. Ugh!  Well, I had no choice but to make an envelope using the Martha Steward Scoreboard and I loved, loved,loved the results!

My card was approx. 5.12” x 5.5” and I tried the measurements for the 6X6 card listed on the board, but that was just too large.  And after some adjustments I was able to make the perfect envelope. 
Measurements used to create a square envelope for a 5.5 X 5.5 card:
  1. Cardstock 10 x 10.
  2.   Using the envelope triangle that comes with the board, score at 4 1/4 on all four sides.
  3.  Fold and Ta Da! Perfect envelope. Simple right?
I also added holes (see below) to tie a ribbon through the flap. 
2011 - Blog Pics2
CIMG2977

Here is the other color way. Card and envelope. The paper used for this one was Colorbok and letter stamps from Memory Makers. Everything else is pretty much the same as above.
2011 - Blog Pics42011 - Blog Pics3
I hope these gave you some last minute card ideas for your Mother’s Day Cards and keeps you from making silly mistakes like mine. It’s all good though. For me, it seems every mistake becomes an unexpected new technique.
I will be linking to some Sunday and Monday parties (see my Linky Parties page for a list).

Photobucket

Monday, April 11, 2011

Hello New Follwers and More Cards to Share

It's been a blast getting to know everyone from the Getting Cricky linky party.  Everyone has such great blogs and creative talent.
I'm still trying to get to everyone so don't fret if you haven't heard from me yet.  Has anyone visted all the links yet?  Congratulations if you have!
And a warm welcome to all my new followers! Yay! I'm going to have to do something special when I hit 100 followers.

So today, I have a couple more cards to share.  These were made with a K&Co card kit I've had for a while now however,I updated them with the doily and some baker's twine.  I think they are adorable and a couple of my favorites from my card making marathon. 

What do you think?  Did I update them enough?


 This picture shows some of the 3D details. 
Right now I'm working on a Mother's day card with my Cricut.  I wasn't too pleased with my first try. Not to happy with the paper color choices. Once I get it tweaked  I'll post both and see what you think. 


Photobucket

Thursday, April 7, 2011

Spring Cards

Today I wanted to share a couple of Spring cards I made during my Card-a-Palooza.

These were made with a Making Memories butterfly die cut, Sizzix embossing folders, misc flowers and ribbon and some Brenda Walton rubons. 
Here are a couple of close ups to show you the texture.  I debossed one card and embossed the other. My favorite is the debossed card.  Which do you prefer?


Thanks for stopping by.  I will be posting more of my card a palooza cards soon.


Photobucket
Linking up to these parties:
Katie's Nesting Spot
giveaways


Photobucket 

Patches of Pink

Sunday, April 3, 2011

Woot! - Another Award and Card-a-palooza

 I just received this awesome award from Sandy O at Paper Transformer. Funny thing is she just found me and already thought my blog was worthy of an award.  Wow! That's such a compliment.  Thanks so much Sandy!

So for this award I have to follow these rules:


Thank the person who sent it to you
Tell Us 7 things about yourself
Send/Reward this to 15 bloggers

Okay so here goes, 7 things about me.
  1. I've been scrapping since 1998. However, I have been fascinated by pretty papers, stickers, stamps, coloring and art ever since I was a kid.
  2. I'm very practical.  If it doesn't make sense or is uncomfortable to me, then I won't do it. Such as wearing heels. I'll be an old lady still wearing sneakers.
  3. I'm a total geek wannabe. I love being around very intelligent people. I also love geeky shows like Big Bang Theory and Dr. Who.
  4. I don't have children so it's just me, my DH and my pup Xena. It's not that we can't; it's just another practical decision.
  5. I'm a blog addict.  I think I follow over two hundred blogs via my reader, my favorites, my blog and Flud.  So don't feel bad if you are not listed on my site because I'm still following you somewhere. 
  6. When I'm interested in learning something, I want to absorb everything I can about that subject.  Like scrapbooking; I may just be a walking encyclopedia on the subject. Go ahead, ask me anything.
  7. I am awesome at caulking.  Don't know why or how it happened but let me tell you, I can make the neatest, smoothest caulking line with just my finger. LOL!
So now, I want to award some awesome bloggers that I follow so stop by and visit them:
  1. Bug Junkie
  2. Passionately Artistic
  3. Diane's Crafts
  4. Cards TV
  5. So Not Mocha-vated
  6. The Green Cricut
  7. Through Emily's Eyes
  8. Sarahndipities
  9. Eighteen 25
  10. Brenda's Agenda
  11. Scrapping Latina
  12. Lil Luna
  13. Bursts of Creativity
  14. Under a Cherry Tree
  15. But it's a good place to start
 Whew! That was a lot of work! 
 
So, now I want to update you as to what I'm working on.  I've been making a bunch of cards for a couple of ladies that wanted to by them by the bunch.  So I'm having my own Card-a-palooza! Yeah!  Here's a sneak peek at the ones I've already done.  I'll share more individual pics in the future so stay tuned.  These were made using the cricut, some scraps, old and new supplies, premade card blanks, etc. Basically, a little bit of everything.  Nothing better for making a dent in your stash. 


Until next time! 


Thursday, February 3, 2011

Belated Happy Everything!!

Okay, so I missed wishing everyone Happy Holidays and Happy New Year. But I didn't forget to pop in and wish you a Happy Valentine's Day.

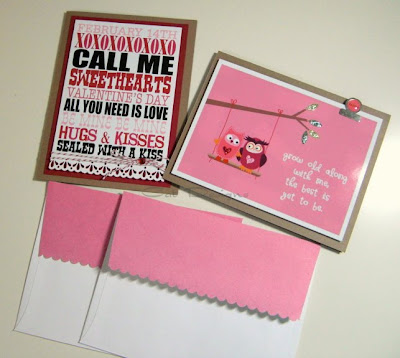
Valentine's Day is just around the corner. Are you ready for it? Did you get all the people you love a token? We're not big on Valentine's but I do love all the cute products and ideas that are available for this holiday. So, when I found some great digital art, I decided to make cards out of them.


Now, I'm not a big digital designer, but sometimes I love the ease of just printing and creating with none of the mess. I just used some glitter, an Anna Griffin border punch, some twine and scalloped scissors and voila! Simple and cute.

These adorable digital prints were downloaded from It's a Crafty Life and Eighteen25. Thanks for the great art ladies!

Next, a friend and I decided to try our hand at making some milk cartons without the Stamping Up Die. We found a bunch of video tutorials on YouTube and managed to create our own and design our own carrier. Here's my take on them.


Aren't these precious?! And no die needed! I am going to fill them up with some Valentine yummies for my sweetie. Once I get a chance, I will post a tutorial for these on ScrapaholicsQClub in the near future. So keep an eye out for that if you want to make your own for Easter, Mother's Day or whenever. I used Little Yellow Bicycle Paper for this one and a Martha Stewart heart punch.

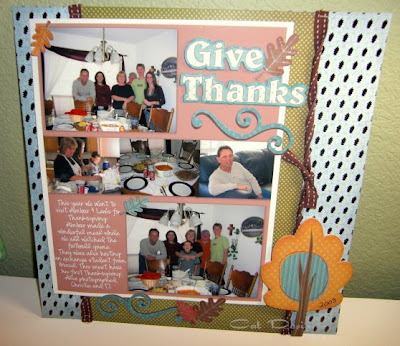
Next, I leave you with a scrap page I just created. Yep, these pictures are from 2003, but hey are you all caught up on your scrapping?


Here's a close up of the glitter and foil effects on the paper.
The paper was DCWV autumn stack and the die cuts were purchased at Michaels. I've had them for a couple of years now so I don't remember what company made them. I created the collage on my computer with Foto Fusion. I love their collage program; it's super simple and quick to make great collages. I purchased their program about 5 years ago and I still love it.


Well, that's all I have for you today. Stay tuned next time when I show you how to weave a basket out of corn husks... HA! Soooo, not happening.

Stop by SQC and say hello sometime!


Friday, October 29, 2010

Happy Halloween!!

I hope everyone has a fun and safe Halloween! I wanted to stop in and share a couple of cards I made for Halloween this year.
Even though I don't have children to share in the Halloween fun, I still love to play with the fun images of the holiday. And so, I also made a little treat bag with my Cricut for a friend's daughter. I think it came out pretty cute and it took less than 1/2 hour to cut and put together.
Here's the front.
And this is the back.
For some reason this year it seemed like a long Halloween season. I don't know why, maybe because I started decorating for fall and creating Halloween projects in mid September. Then I volunteered for our neighborhood's Fall festival earlier this month or maybe it's because I read about so many other bloggers who've been preparing for the holiday also. Nonetheless, I've had fun and am now turning my sights to Christmas.


For November, we are having a fun handmade Christmas ornament contest/challenge at ScrapaholicsQClub. There is still time to join us if you'd like and you only need to make one handmade ornament for this simple challenge.


I'll try to stop in again soon and share some Christmas projects.


Wednesday, August 18, 2010

What I've been up to lately


Hello! I know it's been a while since I've posted here but I've been so busy working on our new crafty community Scrapaholics Q Club. At SQC we share our ideas, techniques, findings and news on the scrapbooking industry. We also have fun sharing our projects in our gallery and we've just started a fun swap group. So, you should come on by and join us. Everyone crafty is welcome.

Right now, we have a contest sponsored by CropStop.com. The winner gets a $30 gift certificate! So you can make your own prize package. How cool is that!

Now, before I leave, I wanted to share some of my latest projects that I've shared at SQC.


Hope you are having a great Summer!


Thursday, May 6, 2010

Happy Mother's Day!

Just a quick pop in to wish all the Mothers in the world a wonderful upcoming Mom's Day.

In honor of Mother's day I created the following layout:


This layout was inspired by the Playing with Punches course I took at My Creative Classroom (Also, check out their Haiti Benefit Class).
All the scalloped circles and butterflies were punchies from scraps. Have you noticed all the butterflies in paper crafts right now. I just had to punch some out also. Here's a close-up.


I also made a cutsie Mother's Day Card. I used the Cricut Straight from the Nest for the birds and I stamped the ribbon. The three birds represent my Mother's three children.


Then I was in a card making frenzy and made a couple more cards just for fun. The one below is very dimensional but I didn't take a very good pic of it. The butterflies here were stamped and cut out, not punched.
This one was made with the Cricut Create a Critter. At first, I did not know what the accessories for this image were. Then I asked my DH and he figured out it was a skirt! I can't believe he could figure that out and I couldn't! I cut the band of the skirt and center of the flower out of foil paper. That's why it looks a bit strange in the photo and the mat looks lopsided. Anyway, isn't she just adorable?

These projects made me realize something very interesting about myself. I realized I love to scrap more than I like to make cards. Card-making is a beautiful craft and offers instant gratification but I feel I've accomplished something more important for me when I create a scrapbook layout. I will look at it again and again and admire it more so than I do a card.

You usually have to give a card away after you've worked so hard to make it. Do the people you give the card to truly appreciate the effort you put into it? Do they keep it forever? I can go back to my scrapbooks and appreciate every little thing I did on that page. I can remember my mistakes and what I did to correct them. I can remember how long it took me to find the perfect paper or the perfect embellishment to go with the pictures. And you know what? When you're gone, someone is going to treasure those scrapbooks. There's something so gratifying about that.

I've also noticed more blogs and challenges changing gears towards card-making, even when they claim they have scrapbooking or show scrapbooking in their menu. There's still a large group of us scrapbookers out there and we love to share ideas and see some of your ideas for layouts. Please don't forget about us.

There's a great little group of us at Scrapaholics.ning.com. We are in the middle of working out some changes but we would love to share ideas and shopping tips with you.


Have a good one!


Read more: http://www.mylivesignature.com/wizard2_2.php#ixzz0nDWojQ9m